Submitting a dance video for professional coaching feedback should be straightforward, but many dancers hesitate because they're unsure how to capture their dancing properly. Should you invest in expensive camera equipment? What angle shows technique best? How do you avoid that washed-out lighting that makes it impossible to see your footwork?
The good news: you probably already own everything you need to record high-quality coaching videos. Your smartphone, decent lighting, and basic setup knowledge will produce videos that give coaches everything they need to provide detailed, actionable feedback. This guide walks through exactly how to record dance videos that help you get the most value from online coaching.
Why Video Quality Matters for Coaching
Your coach can't fix what they can't see. Blurry footage, poor angles, or bad lighting don't just make your video look unprofessional—they prevent coaches from identifying the technical issues holding you back. When a coach can't clearly see your foot placement, frame position, or body alignment, their feedback becomes general rather than specific. The difference between "work on your frame" and "at 0:45 your left elbow drops three inches as you enter the corner, collapsing your connection" is video quality.
Quality doesn't mean professional videography. It means your coach can see your full body, distinguish your movements clearly, and track details like footwork and arm styling. With the right setup, a smartphone produces coaching videos every bit as effective as professional camera equipment.
Equipment You Actually Need
The Camera
Your smartphone is almost certainly good enough. Modern phones record in 1080p or 4K resolution, which provides more than sufficient detail for dance coaching. The iPhone 11 or newer, Samsung Galaxy S10 or newer, or equivalent Android devices all produce excellent results. If you have an older phone that still records in 720p, that works too—resolution matters less than proper positioning and lighting.
Dedicated cameras offer advantages for serious competitors who want the absolute best footage, but they're not necessary for effective coaching videos. If you already own a DSLR or mirrorless camera, by all means use it. If you don't, your phone is fine.
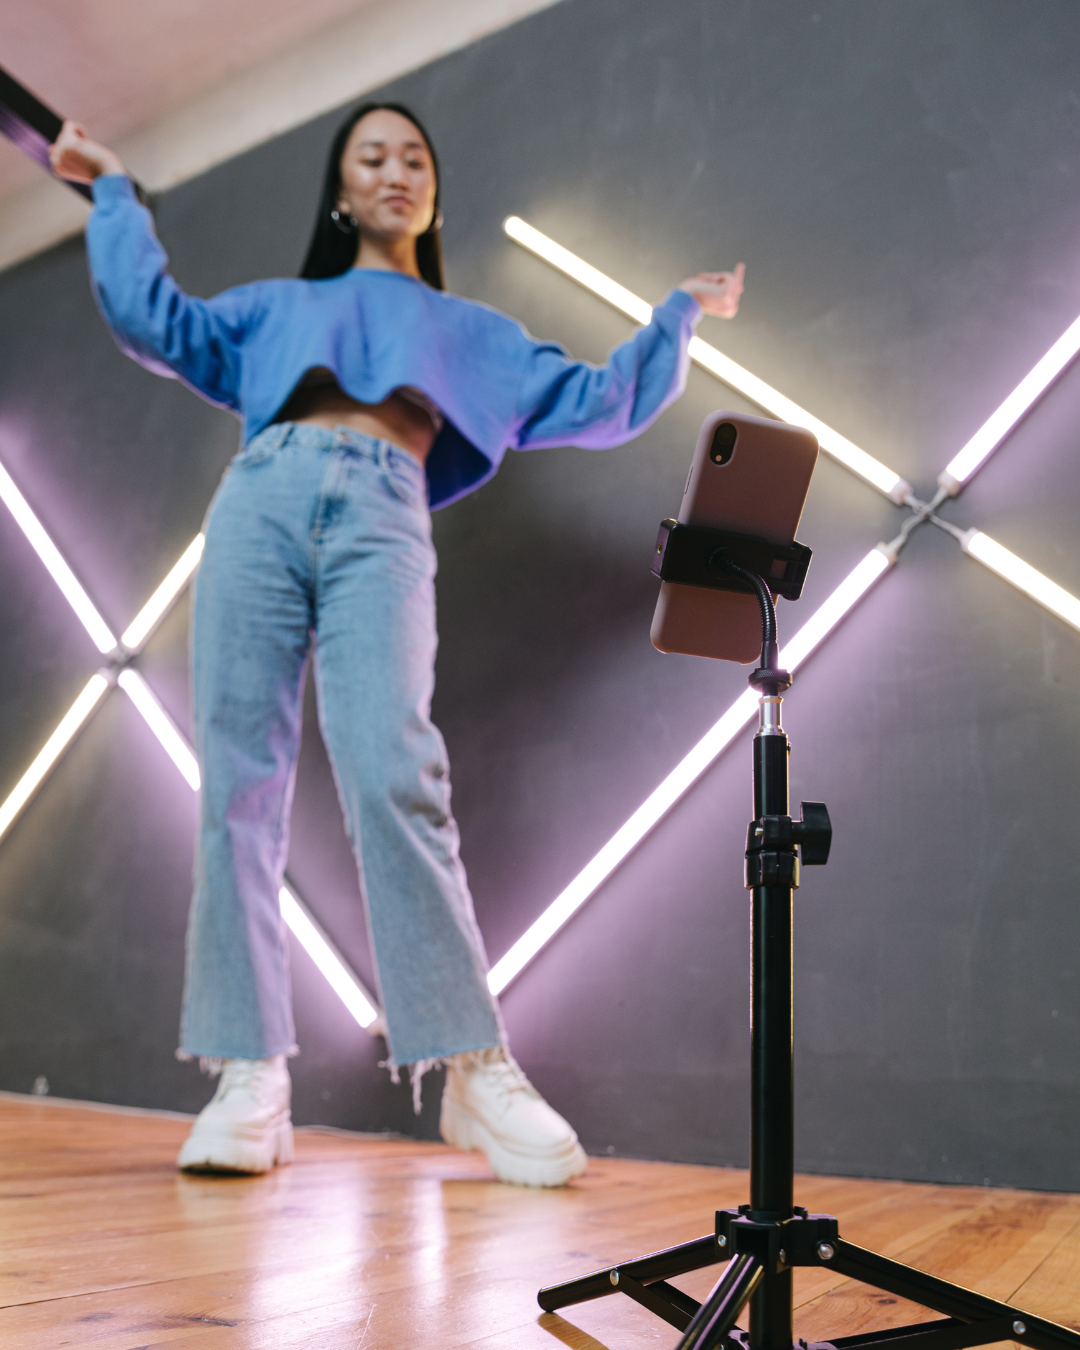
The Tripod
This is your only essential purchase if you don't already own one. Handheld or propped-up phones create shaky, inconsistent footage that's difficult for coaches to analyze. A basic smartphone tripod costs $15-30 and transforms your video quality immediately.
Look for tripods with:
Adjustable height (ideally 20-60 inches)
Stable base that won't tip during recording
Phone mount that securely holds your device
Ability to position horizontally (landscape orientation)
Floor tripods work well for full-body shots. Tabletop tripods are portable and convenient but limit your positioning options. For home practice, a full-size adjustable tripod offers the most flexibility.
Optional Upgrades
External microphones improve audio quality if you're recording in noisy environments or want to capture music clearly, but most coaching videos don't require professional audio. Your phone's built-in microphone handles music and ambient sound adequately.
Ring lights or photography lights solve difficult lighting situations, but proper positioning near windows or in well-lit spaces usually suffices. Consider lighting equipment only if you consistently record in poorly lit spaces with no natural light options.
Setting Up Your Recording Space
Choosing Your Location
You need enough space for your full routine with the camera positioned far enough back to capture your entire body throughout the dance. For ballroom dancing, this typically means 15-20 feet of floor space with the camera 10-15 feet away. Latin and rhythm dances with larger movements might require slightly more space.
Your background matters less than you might think. Coaches focus on your dancing, not your surroundings. That said, avoid cluttered or visually busy backgrounds that make it harder to track your movement. A plain wall, mirrors (more on this below), or simply an empty studio space all work perfectly.
The Mirror Question
Recording in front of mirrors creates a dilemma. Mirrors let you see yourself during practice, which helps your awareness and positioning. However, mirrors in frame can confuse coaches—they're watching both you and your reflection, which sometimes creates visual conflicts or makes it harder to track specific movements.
If possible, position your camera to capture you with minimal mirror in frame. Angle slightly to avoid direct reflection, or record in areas of the studio where mirrors don't dominate the background. If mirrors are unavoidable, that's fine—just be aware that clear, mirror-free backgrounds make coaches' jobs slightly easier.
Camera Positioning and Angles
The Full-Body Shot
Your primary coaching video should capture your entire body from head to toe throughout the entire routine. This means:
Camera at approximately chest to shoulder height (adjust based on your height)
Positioned far enough back that you never leave the frame
Capturing both partners fully if you're recording partnership dancing
Maintaining the same angle throughout (don't zoom or pan)
Test your framing before recording your actual routine. Dance through your typical movement range and verify you stay completely in frame. If your head or feet disappear at any point, move the camera back or adjust the height.
Landscape vs. Portrait Orientation
Always record in landscape (horizontal) orientation. Dance moves horizontally across the floor, and landscape framing captures this movement naturally. Portrait orientation cuts off partnering positions and makes it difficult to see full-body alignment.
The only exception: if you're specifically recording footwork details for a coaching question about foot placement, portrait orientation can work for that supplementary footage. But your main coaching video should always be landscape.
Optimal Angles for Different Styles
Ballroom standard and smooth dancing typically looks best from a front or 45-degree angle where coaches can see frame, body contact, and footwork clearly. Straight-on frontal shots work well for waltz, foxtrot, and quickstep where rise and fall and body sway are crucial elements.
Latin and rhythm dancing often benefits from slight side angles (45 degrees) that show hip action, body rotation, and arm styling more clearly. Cha cha, rumba, and salsa have distinct hip movements that side angles capture more effectively than pure frontal shots.
If you're uncertain, record from a 45-degree front angle—this compromise position shows enough of everything for comprehensive feedback. For competition preparation, consider recording from multiple angles and submitting your best footage or the angle most relevant to your specific coaching question.
Recording Multiple Angles
While one well-positioned video usually suffices, multiple angles help coaches see complex technical issues. If you're working on a specific problem—say, maintaining frame through turns—recording the same routine from front, side, and back angles gives your coach complete perspective.
Most students find that one high-quality angle provides sufficient information for general coaching. Save multiple angles for specific technical problems or competition preparation where that extra detail justifies the additional recording effort.
Lighting Fundamentals
Natural Light Works Best
Position yourself so natural light from windows illuminates you evenly. The ideal setup places windows to your side or behind the camera, avoiding harsh backlighting that creates silhouettes. Overcast days produce beautifully even lighting without harsh shadows—perfect for dance videos.
Avoid positioning yourself directly in front of bright windows, which creates backlighting that makes you appear dark and hard to see. If your only option involves windows behind you, close curtains or blinds partway to reduce the intensity difference.
Working with Artificial Light
If you're recording in spaces without natural light—studios with no windows or practice sessions after dark—you'll need adequate artificial lighting. Standard overhead lights often create unflattering shadows, particularly if they're directly above you.
For better results:
Use multiple light sources rather than one harsh overhead light
Position lights at 45-degree angles to minimize shadows
Ensure relatively even illumination across your dance space
Avoid extreme contrasts between bright and dark areas
You don't need professional lighting setups. Standard floor lamps or photography clamp lights positioned strategically produce acceptable results for coaching videos.
Exposure and Brightness
Most smartphones automatically adjust exposure, but sometimes they get it wrong. If your video looks too dark or too bright, tap your image on the phone screen before recording to manually set exposure. Most camera apps let you adjust a brightness slider to fine-tune the exposure.
The goal is clear visibility of your body, movement, and details like foot positions. Your video doesn't need to be cinematically lit—it needs to be clear enough for coaching analysis.
What to Wear
Contrast is Key
Wear clothing that contrasts with your background. Dark practice wear against light walls, or light-colored clothing against darker backgrounds. This contrast helps coaches track your body position and movement more easily.
Avoid wearing colors that match your background too closely—black clothing against dark walls or white against white backgrounds creates a visual blur that makes technical analysis difficult.
Form-Fitting Practice Wear
Coaches need to see your body lines, posture, and movement. Baggy or loose clothing hides body position and makes it impossible to analyze alignment issues. Form-fitting practice wear—fitted tops, dance pants, or leggings—shows your body positioning clearly without being revealing.
For ballroom and standard, practice in clothing similar to what you'll wear in competition if possible. For Latin and rhythm, fitted practice wear that shows hip movement and body action gives coaches the visual information they need.
Footwear Matters
Record in the shoes you actually dance in. Your technique differs between practice sneakers and dance shoes—your balance, foot positions, and movement quality all change with footwear. If you're preparing for competition or working on specific technique issues, wear your dance shoes for video recording.
If you practice in different shoes than you compete in, mention this when you submit your video. It helps coaches contextualize certain technical observations.
Recording Best Practices
Stabilize Everything
Use your tripod. This seems obvious, but dancers often try to prop phones against walls, balance them on chairs, or ask friends to film handheld. These approaches create unstable, shaky footage that's difficult to analyze. Your $20 tripod investment pays for itself immediately in video quality improvement.
If you absolutely must record without a tripod—perhaps you're filming at a competition and forgot your equipment—find the most stable surface possible and ensure the camera is completely still before you start dancing.
Audio Considerations
Your coach needs to hear your music to assess timing and musicality, but audio quality rarely requires special attention. Your phone's microphone captures music adequately for coaching purposes.
If you're recording in a particularly noisy environment—busy studio with multiple rooms, outdoor location with traffic noise—consider using a portable Bluetooth speaker positioned near your camera to ensure music is clearly audible over ambient sound.
Length and Content
For general coaching, 60-90 seconds of dancing usually provides enough material for comprehensive feedback. Full routines work perfectly. If you're working on specific technical issues, shorter clips focusing on that particular movement or pattern are fine.
Include these elements in your coaching video:
Starting position clearly visible before you begin dancing
Complete execution of the movement or routine you want feedback on
Ending position held briefly so coaches can see your finish
Avoid recording excessively long videos unless your coaching package specifically includes extended footage review. Most coaches analyze 1-3 minutes of dancing for standard video critique packages.
The Countdown Approach
Before you start recording your actual take, do a complete run-through to verify:
Full body stays in frame throughout
Lighting looks good
Music is audible
Camera is stable
Then record your actual submission. Many dancers find it helpful to record several takes and submit their best footage rather than sending the first attempt.
Common Recording Mistakes
Camera Too Close
The most frequent error is positioning the camera too close, which cuts off parts of your body during the routine. Dance requires movement across space—your camera needs to capture that spatial range. When in doubt, position the camera farther back rather than closer.
Inconsistent Framing
Some dancers zoom in and out during recording or pan to follow themselves across the floor. Don't do this. Keep the camera stationary with consistent framing throughout. Coaches need stable reference points to analyze your movement—changing camera angles mid-routine disrupts their analysis.
Poor Lighting Choices
Backlighting and harsh shadows are the most common lighting problems. If coaches can't clearly see your body position and footwork due to lighting issues, the video's coaching value drops significantly. Take 30 seconds to evaluate your lighting before recording.
Recording Only Best Attempts
While you want quality footage, recording only your absolute best dancing sometimes hides the issues you need coaching on. If you're working on a specific problem, ensure your video captures that problem so your coach can address it. Recording only perfect executions (if you could even achieve those) prevents coaches from seeing what you actually need help with.
File Formats and Technical Specs
Video Format
Most smartphones default to MP4 or MOV formats, both perfectly acceptable for coaching videos. Don't worry about technical video settings—your phone's default video recording settings work fine. Recording in 1080p provides excellent quality without creating unnecessarily large files.
Avoid recording in 4K unless you have specific reasons to do so. The file sizes become enormous (several gigabytes for a 2-minute video) without providing significantly better coaching value. Standard 1080p resolution shows all the detail coaches need while keeping file sizes manageable.
File Size and Upload Considerations
Typical coaching videos run 50-200MB depending on length and quality settings. Most coaching platforms handle files this size without issues. If your files consistently exceed 500MB, you're likely recording at unnecessarily high settings—switch to 1080p instead of 4K.
Some platforms have file size limits for uploads. If you encounter upload failures, try:
Reducing video length (trim to your actual routine)
Recording in 1080p instead of 4K
Using your phone's "high efficiency" recording mode if available
Compressing the video using free tools like HandBrake
Cloud Storage Backups
Before submitting your video for coaching, save a backup copy to cloud storage (Google Drive, iCloud, Dropbox). This protects against upload failures and gives you a copy for your own reference. Having previous coaching videos saved helps you track your progress over time.
Preparing Your Video Submission
Context for Your Coach
When submitting your video, include helpful context:
What specific areas you want feedback on
What you've been working to improve
Any recent changes to your technique or partnership
The competition or performance you're preparing for (if applicable)
This context helps coaches prioritize their feedback around your specific goals rather than providing general observations.
Multiple Videos for Comparison
If you're tracking progress over time, submitting before-and-after videos showing the same routine several weeks apart gives coaches powerful insight into your improvement and what's working in your training.
For technical issues, sometimes recording the same routine from different angles helps coaches understand complex three-dimensional movement problems.
Special Situations
Competition Footage
Competition videos present unique challenges—you don't control camera position, lighting, or angles. If you're submitting competition footage for coaching analysis:
Choose footage with the clearest view of your dancing
Acknowledge the limitations in your submission notes
Consider supplementing with practice footage recorded under better conditions
Competition footage has value for performance, musicality, and partnership feedback even if technical quality isn't ideal for detailed technique analysis.
Partner Recording
If you're recording partnership dancing and filming alone, use longer recording times to give yourself extra setup time. Start recording, get into position with your partner, and dance your routine. You'll trim the beginning in editing (or just note the timestamp where the dancing actually begins).
Having a third person operate the camera adds convenience but isn't necessary if you set up a stable tripod and timing system.
Outdoor Recording
Dancing outside creates beautiful backdrops but introduces challenges: inconsistent lighting, wind noise affecting audio, and distracting backgrounds. If you record outdoors:
Choose overcast days for even lighting
Position yourself so background is as simple as possible
Ensure music is loud enough to overcome ambient noise
Test your framing carefully—outdoor spaces make distance judgment tricky
Getting Started
Recording your first coaching video feels awkward—you're self-conscious about the camera, uncertain about setup, wondering if you're doing it right. Everyone feels this way initially. Your second video will be easier, and by your third, you'll have the setup process down to a reliable routine.
Start simple: phone on tripod, decent lighting, clear view of your full body. Record a short routine and submit it for coaching feedback. You'll learn more from doing it once than from reading endless advice about theoretical optimal setups.
The technical aspects matter, but what truly matters is taking that first step and getting professional coaching feedback on your dancing. Perfect video quality doesn't exist—good enough quality that lets coaches see your dancing clearly is all you need.
Set up your space, position your camera, and start recording. Your improvement journey begins with that first submitted video, imperfect as it might feel. Every accomplished dancer you admire started exactly where you are now—ready to learn but uncertain about the details. The difference is they started anyway.